Monday, 9 September 2013

Tagged under: , , , ,

Read an Excel file using PHP

Reading an excel file using some server-side scripting language is something that should be in the ammo of any developer. Now, Excel is something which I have always stayed away from...blame it on the insipid UI, or lack of various other features which databases like Oracle, MySql etc provide. However, one cannot deny the fact that Excel is rampantly used to maintain records, and at some point or other, you may have to use excel as an input to your code.

I had faced such a situation recently, and after some googling, I managed to find a way to read the excel sheet and insert the corresponding entries to a MySql database. So, this post of mine will help you in reading an excel sheet using PHP. Once it is read and you have the values of the entries with you, its up to you as to what you like to do with it. In my case, I simply inserted those values in a MySql database.

Have queries?? Get them resolved...

What you need to get started:
PHPExcelReader
SpreadsheetExcelWriter

Download the above two packages. Extract both the packages. Now, in the PHPExcelReader package, find the oleread.inc. Copy this file, and paste it to Spreadsheet\Excel\Reader folder in the SpreadsheetExcelWriter package. It does not have the Reader folder by default. Create that folder and paste the oleread.inc file in it. Now, save the oleread.inc file in the same folder as OLERead.php.
Now, copy the entire Spreadsheet folder from SpreadsheetExcelWriter package, and paste it in the Excel folder in PHPExcelReader package. This 'Excel' folder in the PHPExcelReader package is what we will be using for reading from an excel file using PHP. Once you have done all this copying and pasting, you are all set to read an Excel sheet!!

Step I: Create a simple HTML file 'importexcel.html' to take the excel sheet as an input:
<form action="import.php" enctype="multipart/form-data" method="post">
File Name: <input type="file" name="file" id="file">

<input type="submit" name="Submit" value="Submit" />
</form>

Step II: Create a PHP file 'import.php', where we write the action part for the above form:

<?php

mysql_connect(hostname,username, password) OR DIE ('Unable to connect to database! Please try again later.');
mysql_select_db(dbname);
include 'Excel/reader.php';
$data = new Spreadsheet_Excel_Reader();
$data->setOutputEncoding('CP1251');
$data->read($_FILES["file"]["tmp_name"]);

//columns:
$sql = "INSERT INTO `TABLENAME` (";

for ($j = 1; $j <= $data->sheets[0]['numCols']; $j++)
{
$sql .= "`" . mysql_escape_string($data->sheets[0]['cells'][1][$j]) . "`,";
}
$sql = substr($sql, 0, -1) . ") VALUES\r\n";
//cells
for ($i = 2; $i <= $data->sheets[0]['numRows']; $i++)
{
  $sql .= "(";
  for ($j = 1; $j <= $data->sheets[0]['numCols']; $j++)
  {
  $sql .= "" . mysql_escape_string($data->sheets[0]['cells'][$i][$j]) . ",";
  }
$sql = substr($sql, 0, -1) . "),\r\n";
}
$sql =  substr($sql, 0, -3) . ";";
echo $sql;

mysql_query($sql);

?>


Make sure that you have the 'Excel' folder in the root directory.

If you look at the output of the code, it will print the INSERT query, which is then used in mysql_query to execute the query.

Whats a take away from this tutorial is that, you can access the entries from the Excel sheet by creating an object ('$data' in our example) of Spreadsheet_Excel_Reader class, and then use this object as $data->sheets[<sheet number>]['cells'][<row number>][<column number>] to access the (row,column)th entry of  the corresponding sheet number in the excel.
Once you can access these entries, you can use them in whichever way you want....creating a table in html, or inserting those entries in a database, or any other processing.

Thats it!! Simple it was, wasn't it? Now, go ahead...use this code to read an Excel sheet....njoy!!

Have Queries?? Post it on our Discussion Forum Compild

Monday, 29 April 2013

Tagged under: , , , ,

Root Samsung Galaxy S2 GT-i9100 Jelly Bean and install Clockwork Recovery Mod

With the official Jelly Bean update now available for Galaxy SII, one thing that any android fan would be looking for would be 'How to Root it?'. Rooting the phone unleashes the true power it withholds, making the Android experience all the more exiting! Also, once you root your phone, one very basic thing you need is the Clockwork Recovery Mod.
The below tutorial gives the detailed steps for doing just the same.
The advantage of this method is that, as in the normal rooting, there is no yellow triangle that appears on your booting screen.

Make sure you have following things in place:
  • This guide is for Samsung Galaxy SII GT-i9100 (international version) only. I have not tried this out on any other version
  • Take a backup of whatever you can...ie contacts, messages etc. You  may not be able to take a system backup, as this requires rooted phone
  • Ensure that the phone has atleast 85% battery charge
Have queries?? Get them resolved...


If you have the above things set, then you are ready for what follows...

But first thing first:
Disclaimer: The instructions provided in this guide are meant for reference purpose only. I will not be held liable if the device is damaged during the installation. Users must proceed at their own risk.

This thing hardly takes about 5-10 minutes:

Files needed:
1. SU-BB-Installer.zip(download it from the download box alongside)
2. Clockwork Recovery Mod

And here are the steps:
  1. Place both the files in SD card and boot the phone in recovery mode. To do this, power off your phone & then long press the Volume down + Power + Home buttons simultaneously
  2. You would now be in the stock recovery mode. Now select 'Apply Update from External Storage' and then navigate to the 'SU-BB-Installer.zip' file, and select it using the Power button. Select Yes in the next step...This would now root your phone
  3. Once done, again navigate back to the home screen of the stock recovery, and select 'Apply Update from External Storage'....this time, select the Clockwork Recovery Mod file
  4. This would now replace your stock recovery by the Clockwork Recovery Mod
  5. You can now play around with the various options available in the CWM, like taking a Nandroid backup
  6. Now, reboot your phone
  7. In the list of your applications, you would now see a 'Super User' App. If you are able to see this app...congrats!!... your phone is successfully rooted!
You can now install various apps like the Titanium backup, and other such apps, to tweak the performance of your phone. Once rooted, you also have the luxury to install a number of cool custom firmwares, which would have otherwise required a rooted phone...njoy:)

Now, if you wish to unroot your phone, all you need to do is flash the official Jelly Bean Rom using Odin, and there would be no traces, to prove that your phone was ever rooted!!

Have queries?? Get them resolved on our Discussion Forum Compild

Friday, 8 March 2013

Tagged under: , , , , ,

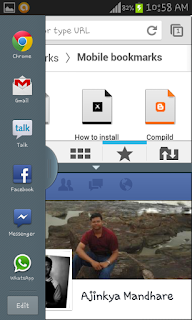
Multi Window and Ripple Lock Screen for Samsung Galaxy S2 GT-i9100 Jelly Bean(4.1.2)

Samsung recently rolled out the JellyBean 4.1.2 update for Galaxy S2. The S2 users, including myself were eagerly awaiting this upgrade, and the cellphone giant Samsung did not disappoint. The JB for S2 breathes in a new life in the phone with the new Nature UX interface, Google Now, and many other exciting things added to the already feature filled Samsung flagship device Galaxy S2.

Have queries?? Get them resolved...


All said and done, there was still a major update that the S2 users were looking forward to....the much famed 'Multi-Window' feature, as in Galaxy S3 and Note2. This was not included in the JB update for S2, which for me was a let down!!
I tried to search for methods to get multi window for my phone....did so much things in that process that at one time, my phone refused to boot back!!
But then I found out these two methods....

  • 'Installing Mods for the Stock JB firmware'(This method is for the Stock JellyBean)
  • Using Deodexed XWLS8 ROM and applying the MODs on it
 by virtue of which I installed Multi window on S2 successfully....and it is running great!!

There are other methods too, but for that, you need a custom ROM(deodexed XXLSJ).

In this post I would share both these methods of installing the Mods for Galaxy S2 for Multi Window and Ripple Lock Screen.


This process requires the following things in place:
  • It was tried and tested only for the International version of galaxy S2(GT-i9100), running XWLS8 Jelly Bean 4.1.2. I'm not sure about the rest of the versions
  • The Galaxy S2 must be Rooted
  • You must have the Clockwork Recover Mod (CWM) installed (You can download the CWM form: http://www.clockworkmod.com/rommanager)
  • Take a NANDROID backup of your phone, just in case some unexpected problem arises
  • Ensure that the phone has atleast 85% battery charge
As usual, comes the disclaimer:
The instructions provided in this guide are meant for reference purpose only. I will not be held liable if the device is damaged during the installation. Users must proceed at their own risk.

Though I have given two methods to get Multi Window for Galaxy SII, I personally prefer Method 2.

Method 1: 'Installing Mods for the Stock JB firmware'

Files Required:
Alliance Mods for Galaxy S2

Step 1: Download the Mods from MultiWindowMods
Step 2: Place the downloaded file in your Sdcard.
Step 3: Now, reboot into Recovery mode. To do this, Power off your phone, and then press the
Volume Up+ Home+ Power button simultaneously.
Step 4: Now, once you are in Clockwork recovery, select 'Install from Zip' option
Step 5: Now, select the file that we downloaded in step 1
The features will now be installed
Step 6: Now, go back and select Reboot
Step 7: Your phone will now reboot

And, its done!! You will now be graced with a Ripple Lock screen. You now need to enable the Multi Window option from the Display Section and you are all set to boast of a Multi Window!!
Also, a section called Alliance Control will be added to the Settings, wherein you can customize the lock screen and other features. Take care not to select the Alliance OTA option as it may mess up your phone.
Snapshots from Method 1


Method 2: Using Deodexed XWLS8 ROM and applying Multi Window Mods


Files Required:
Deodexed XWLS8 ROM
Multi Window Mods

Step 1: Download the Deodexed XWLS8 ROM from DeodexedXWLS8
Step 2: Place the downloaded zip file in sdcard
Step 3: Reboot into Clockwork Recovery Mode
Step 4: Select install from zip, & then select the zip folder downloaded in Step 1
            The deodexed ROM will now be flashed
Step 5: Once done, reboot the phone....you would be graced with the Ripple Lock Screen
Step 6: Download the Multi Window Mod from Multi_Window_Mods
Step 7: Place the zip file in sdcard and again Reboot into Clockwork recovery mode
Step 8: Select install from zip, and select the zip file for mods downloaded in Step 6
Step 9: The Mods will now be installed
Step 10: Once done, reboot the phone

Thats it!! Select the Multi Window option from Settings ->Display section and you are all ready to start enjoying the magic of Multi Window!!

I preferred Method 2 over 1 for the simple reason, as I now have a deodexed ROM, which gives me greater freedom to play around with my phone, and I don't need to worry about the Alliance Mods!!
Snapshots from Method 2:


Have queries?? Stuck anywhere?? Post all the issues on Compild

Tuesday, 2 October 2012

Tagged under: , , ,

Creating a Barcode in PHP


A barcode is an optical machine-readable representation of data relating to the object to which it is attached. Originally barcodes represented data by varying the widths and spacings of parallel lines, and may be referred to as linear or one-dimensional (1D).
A Barcode is generally used to map a product to its characteristics. For example, a barcode is commonly used to identify the product code, and map the unique code to the price of the product in the database. This barcode is a widely used technique.
Creating a barcode is a fairly easy job, provided you have the right font for it. I found one, with relative ease, and guess what....it was free of cost!! I have added the font file in free3of9.zip folder, which can be downloaded from the download box present in the sidebar. I really want to thank the creator of this font, for his hardwork, and also making his work available free of charge.
Once you have the right font, the rest is quite an easy job. we will use the basic function in PHP, viz

imagettftext($img, $fontsize, $angle, $xpos, $ypos, $color, $fontfile, $text);
Now, create a PHP file, which I have named as index.php in my case.

Include the following code in the file:

<?php

$number = '*8108137*';

$barcode_font = 'FRE3OF9X.TTF';

$width = 200;
$height = 80;

$img = imagecreate($width, $height);

// First call to imagecolorallocate is the background color
$white = imagecolorallocate($img, 255, 255, 255);
$black = imagecolorallocate($img, 0, 0, 0);

// Reference for the imagettftext() function
// imagettftext($img, $fontsize, $angle, $xpos, $ypos, $color, $fontfile, $text);
imagettftext($img, 36, 0, 10, 50, $black, $barcode_font, $number);

//imagettftext($img, 14, 0, 40, 70, $black, $plain_font, $number);

header('Content-type: image/png');

imagepng($img);
imagedestroy($img);

?>
Here, in this code, the code for which barcode needs to be generated is stored in the $number variable. Care needs to be taken that the code starts and ends with an asterisk (*). The barcode scanner starts looking for an asterisk, and then scans ahead of * till it reaches the ending *.
For example, if the code is 1234567, it is represented as *1234567*.
Now, this number, or code can be passed from another page, using the GET method of PHP.
Your code is now ready!! Open your project in localhost, and see your code generating a Barcode!! 

If you found the post helpful, please share!!

Saturday, 14 July 2012

Tagged under: , , ,

Secure Login Code using PHP and MySQL / Preventing SQL Injection using PHP

Many Web pages accept parameters from web users and generate SQL queries to the database. SQL Injection is a trick to inject SQL script/command as an input through the web front end.

Your application may be susceptible to SQL Injection attacks when you incorporate invalidated user input into the database queries. Particularly susceptible is a code that constructs dynamic SQL statements with unfiltered user input.


Consider the following example code:
Sql DataAdapter myCommand = new SqlDataAdapter(
"Select * from Users
Where UserName = ' "+txtuid.Text+" ", conn);

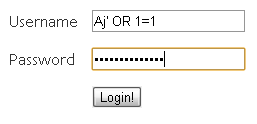
Attackers can inject SQL by terminating the intended SQL statement with the single quote character  followed by a semicolon character to begin a new command and then executing the command to their choice. Consider the following character string entered into the .txtuid field.
' OR 1=1
This results in the following statement to be submitted to the database for execution:
SELECT * FROM Users WHERE UserName = ' ' OR 1 = 1;

Because 1=1 is always true, the attacker retrieves very row of data from the user table.

Now, to prevent such an attack, a secure login technique is required. Here, in this article, we discuss the coding of a secure login script using PHP and MySQL.


Step I: Create a database and a table 'members' in it:

CREATE TABLE `members` (
  `username` varchar(20),
  `password` varchar(128)
)


Step II: Create a Login Form:

<form action="process_login.php" method="post">
Username: <input type="text" name="username" /><br />
Password: <input type="password" name="password" /><br />
<input type="submit" value="Login" />
</form>


Connect to MySQL Server:

$host = 'localhost'; // Host name Normally 'LocalHost'
$user = 'root'; // MySQL login username
$pass = ''; // MySQL login password
$database = 'test'; // Database name
$table = 'members'; // Members name
 
mysql_connect($host, $user, $pass);
mysql_select_db($database);


Step III: Now, you need to provide mechanism to avoid SQL Injection. For this, escape special characters like ", ', \

We can escape special characters (prepend backslash) using mysql_real_escape_string or addslashes functions. In most cases PHP will this do automatically for you. But PHP will do so only if the magic_quotes_gpc setting is set to On in the php.ini file.
If the setting is off, we use mysql_real_escape_string function to escape special characters. If you are using PHP version less that 4.3.0, you can use the addslashes function instead.

name = mysql_real_escape_string($_POST['username']);
$password = md5($_POST['password']);
 
$result = mysql_query("SELECT * FROM $table WHERE username = '$username' AND password = '$password'
");


Here, we use the MD5(Message Digest 5) Algorithm, that generates the message digest for the password. So, while writing the script for registration page, care must be taken that the md5 of the password entered by the user must be stored in the database, instead of the actual text password. In a real world situation, do not use MD5, as it is no longer considered secure. Use some other secure hashing algorithm.

Validating the login:

if(mysql_num_rows($result))
{
  // Login
  session_start();
  $_SESSION['username'] = htmlspecialchars($username); 
}
else
{
  // Invalid username/password
  echo '<p><strong>Error:</strong> Invalid username or password.</p>';
}
 
// Redirect
header('Location: http://www.example.com/loggedin.php');
exit;


You are done!! This code will help prevent the SQL injection problem. However, it must be noted that no script is 100% secure. So, it is advisable to provide multilevel security process, which make the login more secure.

Wednesday, 11 July 2012

Tagged under: , , ,

Auto Refresh a Web Page using AJAX

AJAX is nothing but Asynchronous JavaScript and XML. It is not a new programming language, but a new way to use the existing standards. It is the art of exchanging data with a server, and updating parts of a web page without reloading the whole page!!

Ajax is not a single technology, but a group of technologies. HTML and CSS can be used in combination to mark up and style information. JavaScript and XMLHttpRequest object provide a method for exchanging data asynchronously between browser and server to avoid full page reloads.

 Using JavaScript for periodically refreshing a page can be quite annoying, as the entire page reloads time to time. Hence, a better option would be to use AJAX.
Include the following code in the <head> section of the page....

<script src="http://ajax.googleapis.com/ajax/
libs/jquery/1.3.0/jquery.min.js"></script>
<script>
var auto_refresh = setInterval(
function()
{
 $.ajaxSetup({ cache: false });
$('#loaddiv').fadeOut('slow').load(window.location.href).fadeIn("slow");
}, 20000);
</script>


The section now refreshes after every 20 seconds. You can change the 20000 value to suite your requirements.
You can remove the ".fadeOut('slow')" and ".fadeIn(Slow)" parts if you want the page to be refreshed unnoticed.

Now, whichever section you want to be refreshed, must be included within the <div id="loaddiv"> tags as follows:

<div id="loaddiv">
<!--Your Content goes here-->
</div>


You are now done!! Enjoy as your page refreshes without you noticing!!

Sunday, 8 July 2012

Tagged under: ,

Checking if your Computer has been violated and infected with DNS Changer

Domain name system (DNS) is the part of the internet that links a website name (say example.com) to its numerical internet protocol equivalent (say 123.456.789.098). As the cyber world awaits Monday, when the FBI will shut down servers affected by the DNS changer malware, there is still a day to check if your system has been affected.
Various cyber security firms are offering free solutions. You can visit www.mcafee.com/dnsdetect to check if your computer is infected.
You can also manually check if your DNS server has been changed.

Step I: Open Command Prompt.
           Navigate to Start-> Run.  Type cmd and hit enter.


StepII: (For Windows XP)Type ipconfig/all and hit enter.
           (For Windows 7) Type ipconfig/allcompartments/all and hit enter.


Step III: (For Windows XP) The command you entered displays information about your computer’s network settings. Read the line starting with "DNS Servers". There might be two or more IP addresses listed there. These are the DNS servers your computer uses. Write down these numbers.

(For Windows 7) The output will be very long, since Windows7 by default has support for IPv6. Most likely, you want to look for the IPv4 information under the section entitled “Ethernet adapter…”. Look for the “DNS Servers” line, and write down these numbers. There may be two IP addresses listed there.

Step IV: Check if your DNS settings are OK

Compare your DNS settings with the known malicious Rove DNS settings listed below:
Starting IP Ending IP CIDR
85.255.112.0 85.255.127.255 85.255.112.0/20
67.210.0.0 67.210.15.255 67.210.0.0/20
93.188.160.0 93.188.167.255 93.188.160.0/21
77.67.83.0 77.67.83.255 77.67.83.0/24
213.109.64.0 213.109.79.255 213.109.64.0/20
64.28.176.0 64.28.191.255 64.28.176.0/20

 What if you are infected?
If you computer is infected, please refer the page that list tools to clean DNS Changer and other self help guides to clean your computer – http://www.dcwg.org/fix/